QuickBooks Error 1334 occurs when the .NET framework is damaged or the installation files are missing/corrupted. Error Code 1334 usually arises when installing, repairing, or updating QuickBooks Desktop.
You may encounter the following error:
Error 1334. Error writing to file [file name]. Verify that you have access to that directory.
Error 1334. The file cannot be installed. Insert the QuickBooks CD and retry.
In this post, we’ve discussed the causes and solution steps to fix this issue.
Causes of QuickBooks Error Code 1334
- QuickBooks Desktop installation file is damaged/missing
- .NET Framework is corrupted
- QuickBooks isn’t updated with the latest release
Quick Note: The process to fix this error code may be complex, you can speak with our experts for a quick resolution.
4 Simple Steps to Fix QuickBooks Error 1334
Step 1: Update QuickBooks Desktop
- Open QuickBooks Desktop
- Go to Help > Update QuickBooks Desktop…
- Click on Update Now
- Click Get Updates
- It may take some time to update the QuickBooks Desktop
- Click Close
Step 2: Open the Company File from the Location
You need to follow this step when you get the error code while launching or opening the QuickBooks Desktop.
- Press Windows+E to open the File Explorer
- Click on This PC on the left pane
- Type *.qbw and hit Enter. This process will take some time to find the company file. Note: QBW is an extension of the QuickBooks Company File.
- Double click on the [Company File].qbw file.
Step 3: Clean Install QuickBooks Desktop
You can perform this step when you’re facing an error code while updating or repairing QuickBooks Desktop.
Important: Before you uninstall QuickBooks Desktop. Make sure to be handy with your product information such as License Number and Product Number. You can find this info by pressing the F2 key or Ctrl+1 key on QuickBooks.
- Press Windows+R keys together to open a Run command
- Type appwiz.cpl and click OK
- Under Programs and Features select QuickBooks and click Uninstall
- Click Yes, If prompts you
- Then, click Next and choose Remove
- Click Next and then Remove
- It may take some time to uninstall QuickBooks from your computer
- Click Finish, Once the installation wizard successfully uninstalled QuickBooks
Step 4: Manually fix Windows Component
If any of the above three steps didn’t work for you we recommend you fix your Windows component manually. If possible, try to contact any IT expert or speak with Microsoft support about this.
Repair Microsoft .Net framework
- Press Windows+R keys together from the keyboard
- Type Control into the Run Window
- Go to Programs > Program and Features
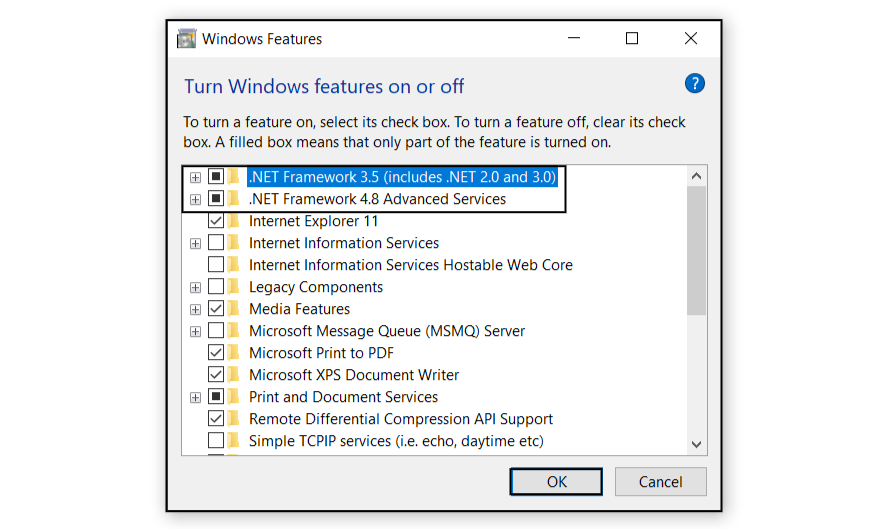
- Click on Turn Windows features on or off
- If, .NET Framework 3.5 and later are check make them unchecked and click OK, now restart your computer
- After restarting your computer make sure to check .Net Framework 3.5 and later again and follow on-screen instructions.
Repair Microsoft MSXML
- Press Windows+R keys from the keyboard
- A Run box pop out from the screen, type appwiz.cpl into it and click OK
- Select MSXML 6.0 from the list and click on uninstall(at the top of the list)
- Now download the msxml.msi file from the Microsoft Website
- Once it’s downloaded make a double click on it and follow the on-screen instructions.
- Install QuickBooks desktop after the complete install of the MSXML file
After following all the above steps you’ll no longer face QuickBooks Error Code 1334 but in case the same problem still exists you can speak with our experts or leave us your message.
Related Posts