QuickBooks Error H202 occurs when you’re trying to switch company files into multi-user mode. Also, Error code H202 generally appear when something is blocking multi-user connection on your server computer.
In this post, we’ll discuss the causes and solution steps to fix it.
Depending on the cause of H202 there are several troubleshooting steps to fix.
Quick Note: You may also face QuickBooks Error H505
Causes for QuickBooks Error Code H202
- QuickBooks services aren’t running on your server such as QBCFMonitor
- Current firewall settings blocking access for QuickBooks
- QuickBooks Database Server is damaged
- Improper company file hosting configuration
- Incorrect DNS Settings
Things to do before troubleshooting the problem
A. Create a Company File Backup
- Open QuickBooks
- Go to File > Back Up Company > Create Local Backup
- Now follow onscreen instructions to create a company file backup
B. Update QuickBooks Desktop
- Close QuickBooks & press and hold Ctrl key from the keyboard. Don’t release the keys until QuickBooks is open on your computer.
- Go to Help > Update QuickBooks Desktop…
- Click on Update Now tab to the top
- Click Get Updates
- Once QuickBooks update successfully click on Close
Quick Note: Process to fix this error code may complex, you can speak with our experts. TollFree 1-877-353-8076 or leave us your message.
5 Simple Steps to Fix QuickBooks Error H202
Step 1: Download and Install QuickBooks Tool Hub
- Download QuickBooks Tool Hub
- Once it’s downloaded, go to your browser download list (Ctrl+J)
- Then click on QuickBooksToolHub.exe
- Now follow on-screen instructions to install it
- Once the installation is complete, then open this tool from the desktop icon
Step 2: Run QuickBooks Database Server Manager
As we download QuickBooks Tool Hub in the above step, it’s time to run QuickBooks Database Server Manager with the help of it.
- Make a double click on QuickBooks Tool Hub to open
- Then select Network Issues tab, now click QuickBooks Database Server Manager
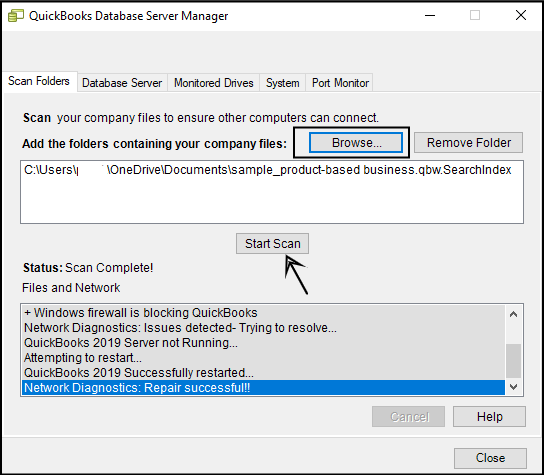
- If QuickBooks Database Server Manager shows the correct company file location click on Start Scan but if not click on Browse to select the company file folder and then click Start Scan (See an Image Below)
- Now QuickBooks Database Server Manager will repair your firewall and provide all the efficient permission to access in all workstations
- Once the repair is successful click on Close
- Now open QuickBooks Desktop on the computer where you encounter Error Code H202. Then go to File > Switch to Multi-User Mode.
If the above steps don’t work, please proceed further with the below ones too.
Step 3: Ensure about QuickBooks Services
You need to ensure that QuickBooks services are running properly such as QuickBooksDBXX and QBCFMonitorService. XX represents the QuickBooks year edition, For example, You’re using QuickBooks Pro 2019 so QuickBooksDBXX shows you as QuickBooksDB29.
QuickBooksDBXX
- Close QuickBooks Desktop
- Press Windows+R keys together to open Run
- Type services.msc into the Run and then click OK
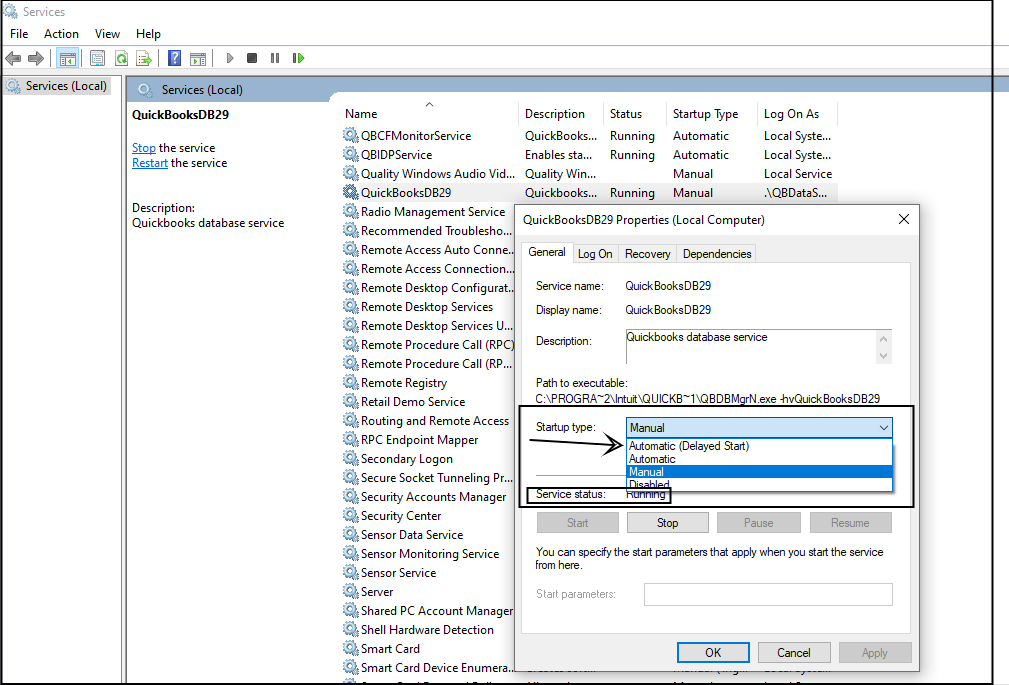
- Under the services look for QuickBooksDBXX and make a double click on it
- Under the Startup type, and choose Automatic
- Also, make sure Service status shows you as Running
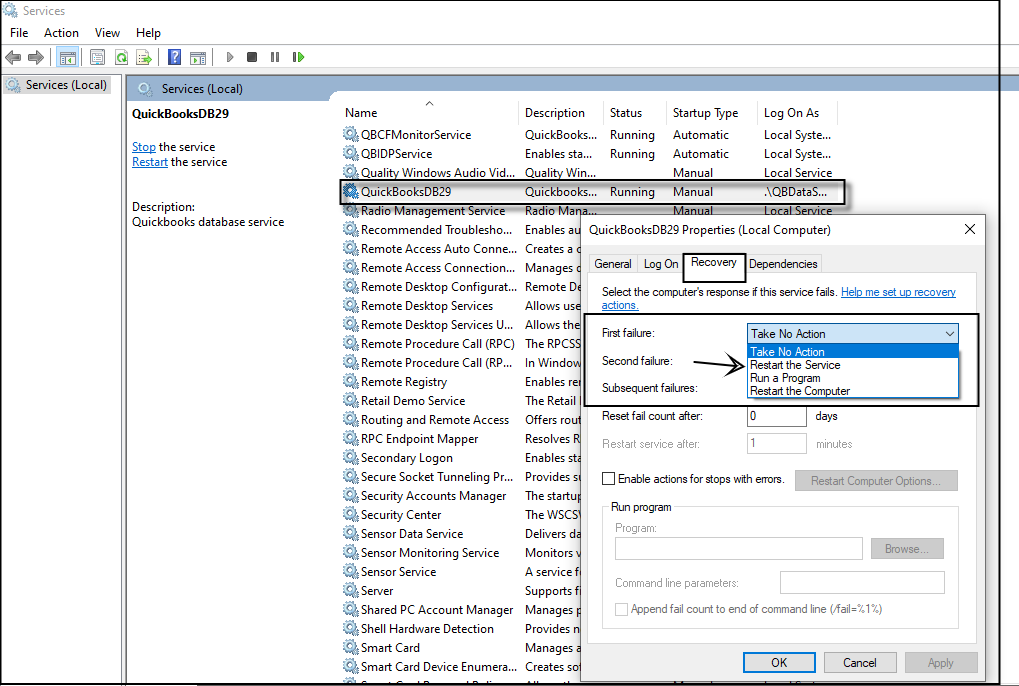
- Now select Recovery tab
- Select Restart the Service, under the First Failure, Second Failure, Subsequent failure
- Then click Apply and OK
Do the same steps for QBCFMonitorService as well.
Now open QuickBooks Desktop and go to File > Switch to Multi-User Mode. If everything is working on your server and workstations that means the problem has been resolved but in case it still exists, please proceed further.
Step 4: Allow admin permission to QuickBooks Services
You need to make sure that QuickBooksDBXX and QBCFMonitorService have admin permission on your server and workstation. To make sure:
- Make a right-click on the folder that contains your company files and choose Properties
- Now select the Security tab and click Advanced
- Under the Permission entries select QBDataServiceXX and select Edit
- Click on Show advanced permissions
- Make sure below permissions set as Allow
- Traverse Folder/Execute File
- List Folder/Read Data
- Read Attributes
- Read Extended Attributes
- Create Files/Write Data
- Create Folders/Append Data
- Write Attributes
- Write Extended Attributes
- Read Permissions
Note: The above steps only mentioned under the impression of workstation, if you’re facing error code H202 only with your server. You can speak to our experts anytime. TollFree 1-877-353-8076
Once completed, Now open QuickBooks Desktop on your server and workstation.
Step 5: Configure your Firewall Settings
Important: QuickBooks File Doctor usually opens firewall ports and configure them automatically. If not, you can follow the below steps.
- Press Windows+R keys together to open Run
- Type Control into the Run and click OK
- Then select System and Security > Windows Defender Firewall
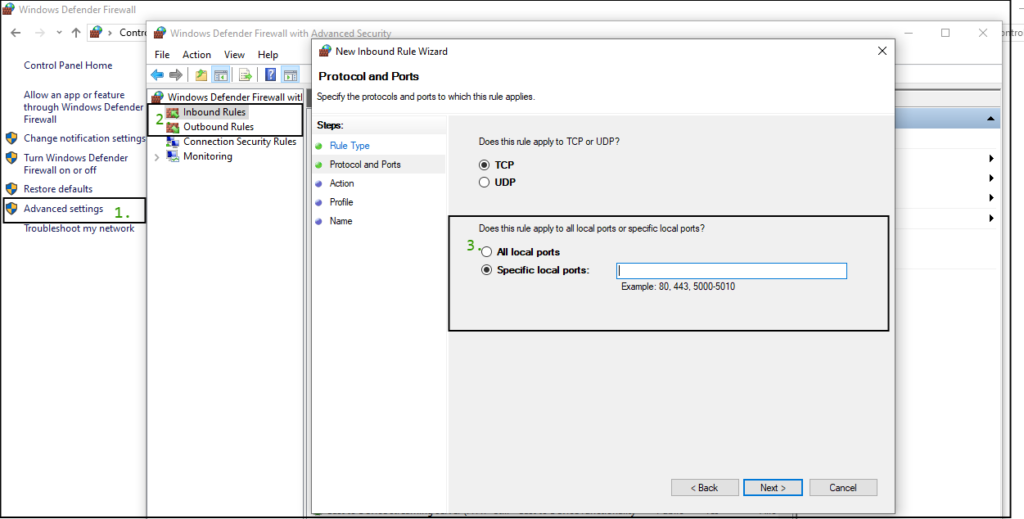
- Click on Advanced Settings
- Click on Inbound Rule and select New Rule… (You can find it to the right hand)
- Then choose Port and click Next
- Ensure that TCP is selected
- You need to enter the Port for your QuickBooks year version.
QuickBooks Desktop ports for version
- 2020: 8019, XXXXX.
- 2019: 8019, XXXXX.
- 2018: 8019, 56728, 55378-55382.
- 2017: 8019, 56727, 55373-55377.
QuickBooks 2019 and after version uses dynamic ports at the time of installation and on the other side QuickBooks, 2018 and older version use static ports.
To find the QuickBooks dynamic ports
- Click on Type here to search
- Then type QuickBooks Database Server Manager and hit Enter
- Once it’s open click on Port Monitor tab
- Now you can see the Port Number for your QuickBooks version
- Make a copy of a Port number, you can use it at the time of the firewall configuration
After following all the above steps you’ll no longer face QuickBooks Error Code H202 but in case if the same problem still exists, you can speak with our experts. TollFree 1-877-353-8076 or let us call you.