You may encounter QuickBooks Error 12029 while updating QuickBooks desktop or payroll. When QuickBooks Desktop is unable to connect with the internet, users may interface with some update issues, and error code 12029 is one of them.
Reasons for this problem could be antivirus or firewall protection blocking to launch QuickBooks or payroll updates, improper security settings setup, etc.
Quick Note: You may also face QuickBooks Error 12002, 12007
Causes for QuickBooks Error Code 12029
- The antivirus program is conflicting between the QuickBooks updates
- Internet Explorer settings aren’t set up correctly
- Internet Explorer isn’t set as a default browser
One thing to do before troubleshooting this error code
Create a Company File Backup
It’s a recommendation from us is to create the company file backup because if there would be any fall back in between the troubleshooting process, you’ll no loose any of your data.
- Open QuickBooks
- Go to File > Back Up Company > Create Local Backup
- Now follow onscreen instructions to create a company file backup
Quick Note: The process to fix this error may complex you can speak with our experts for a quick resolution. Dial our TollFree or leave us your message.
6 Simple Steps to Fix QuickBooks Error 12029
Step 1: Review the Internet Explorer Settings
- Close QuickBooks Desktop and press Windows+R keys from the keyboard to open a Run command
- Type INETCPL.CPL and then click OK
- Under the Security tab, click on Internet icon and make sure the security level of this zone is Medium-high
- Now click on Connections tab, select LAN settings, and make sure Automatically detect settings is checked. Also, ensure that use a proxy server of your LAN is unchecked and if it’s selected, enter the respective address and port.
- Click OK
- Now click Advanced tab, scroll your cursor to the security section and ensure that Use TLS 1.2 is selected.
- Click OK
- Now restart your computer
Close QuickBooks Desktop and try to install the update again.
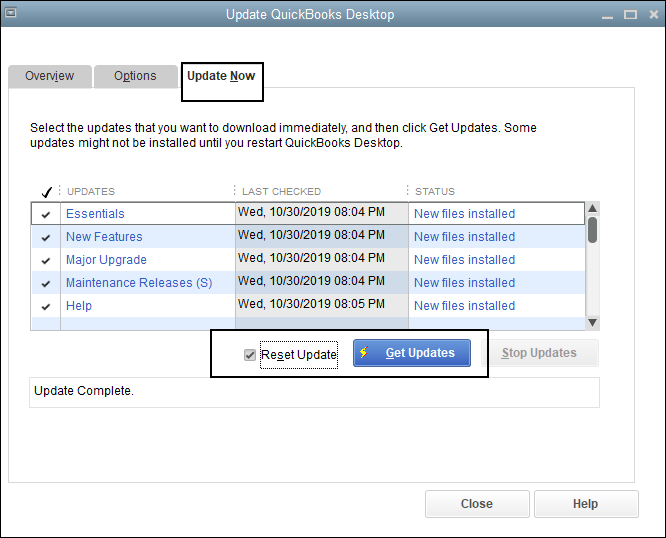
Step 2: Reset QuickBooks Updates and attempt to Install them again
- Open QuickBooks Desktop
- Go to Help > Update QuickBooks Desktop…
- Click on Update Now(To the top)
- Check on Reset Update and click Get Updates
- It may take some time to update the QuickBooks Desktop

Step 3: Check Security Software
Sometimes security software may prevent QuickBooks desktop to launch updates.
You may need to ensure that it’s not blocking QuickBooks access and its file to launch. Finding permission to allow an app is different in every security software.
We recommend you, pause it for a temporary period of time or contact their customer support team.
After following the above 3 steps, if the same problem still exists, please proceed further with the below steps too.
Step 4: Uninstall & Reinstall QuickBooks in Selective Startup
- Press Windows+R keys together from the keyboard and a Run box will come up
- Now type MSCONFIG into the Run box and click OK
- Under the General tab, choose Selective startup and ensure that Load startup items option is unchecked
- Then click OK
- If prompted, click on Restart
- Now Uninstall and Reinstall QuickBooks Desktop
Important: Before you uninstall QuickBooks Desktop. Make sure to handy with your product information such as License Number and Product Number. You can find this info by pressing the F2 key or Ctrl+1 key on QuickBooks.
Step 5: Switch back to the Normal Startup Mode
- Press Windows+R to open a Run window
- Now type MSCONFIG into the Run box and click OK
- Select Normal Startup
- Now click Apply and then OK
- Now restart your computer
Step 6: Download and Install QuickBooks release manually
- Close QuickBooks Desktop
- Go to QuickBooks Download and Update page
- Then select your Country, Product, and Version
- Click Search
- Click on get the latest updates(will be available below to download button). It may take some time to download, depending on the size of the file and internet speed.
- Once it’s download, make a click on the downloadable file(.exe)
- If asks, click Yes
- Now follow on-screen instructions to launch the QuickBooks update.
After following all the above steps you’ll no longer face QuickBooks Error 12029 and if the same problem still exists, you can speak with our experts for a quick resolution. Dial our TollFree or leave us your message.
Related Posts
