Intuit announced discontinuing the QuickBooks Desktop Point of Sale in February 2023, and they partnered with Shopify POS to migrate the company data files. There are many Point of Sale software available in the market but in this post, we’ll only discuss transferring QuickBooks POS to Shopify POS.
QuickBooks Point of Sale 19.0 is the last version that was launched and is going to be supported by Intuit till Oct 3, 2023, and then the product will no longer be supported which leads to the discontinuation of online services such as QuickBooks POS Payments, Intuit Store Exchange, Online Services, etc.
If you would like to keep using QuickBooks Point of Sale you can use it manually but there would be no future security patch updates and other services will be discontinued.
You can migrate QuickBooks Point of Sale data such as customers, vendors, inventory items, and locations to Shopify POS.
To Migrate the data, follow the below complete process.
Context to transfer QuickBooks POS to Shopify POS
- Export Data from QuickBooks Desktop Point of Sale
- Signup to the Shopify Store
- Install QuickBooks Desktop POS Migration Tool to your Shopify Store
- Import the Data Files from QuickBooks Point of Sale to Shopify POS
- Enter the Stocky API key
- Match or Add a New Location to the Shopify Store
Things to do before migrating QuickBooks POS to Shopify POS
Please ensure the below points, prior to migrating QuickBooks POS to Shopify POS
A. Update QuickBooks Point of Sale to the Latest Release
- Open QuickBooks Point of Sale
- Go to Help > Software Updates
- Choose Check for Updates. If an update is available, click Update Now
- Then click OK
B. Upgrade Old QB POS to the Latest Version(19.0)
If you’re using an older version of QuickBooks Point of Sale such as 10.0, 12.0, etc. it’s suggested to upgrade it to the latest version(19.0). You can get the QuickBooks POS 19.0 trial version.
To upgrade QuickBooks Point of Sale to the latest version, please visit here.
C. Close all Programs except QuickBooks POS
You need to close every program on your computer except QuickBooks POS to ensure a smooth transfer process.
Note: In case, you want our experts to help with the transfer process, dial us at 1-877-835-8076
6 Simple Steps to Migrate QuickBooks POS to Shopify POS
Step 1: Export Data from QuickBooks Desktop Point of Sale
You can export the following data to Excel from QB POS.
| Inventory Items | Customers | Vendors | Departments | Employees |
- Open QuickBooks Point of Sale
- Go to File > Utilities > Export
- Choose the type of data you like to export such as Customers, Vendors, etc. For Example, We choose Customers.
- From the Data Export Wizard, do the following to export the Customer
> Select Destination File: Location where the data will be saved
>Write records to (sheet): Worksheet where data will be entered
>Begin exporting data to row: Row where data should be started - From the choose export template, you can select the default template to export the data from QuickBooks Point of Sale
- Click Next
- Ensure that the ready-to-export data is Correct.
- Select Export
Now your data is successfully exported to your computer. You need to follow the same process to export the other data items.
Step 2: Signup to the Shopify Store
- Go to Shopify.com
- Click on Get Started
- The next screen prompts you to enter your email address to get access to exclusive discounts, and migration tools only for QuickBooks Point of Sale merchants
- Click Next
- The next screen prompts you to Sign up for your Shopify account
- Choose your store location such as the United States, etc., and click Next
- Choose the type of Sign up method such as Email, Google, etc. to create a Shopify ID
- Then enter your Email and Create a Password
- Click Create Shopify ID
- It may take some time to validate your account and start building your Shopify store. Once the process is completed, your trial version starts for a month.
Step 3: Install QuickBooks Desktop POS Migration Tool to your Shopify Store
It’s required to download the QuickBooks Desktop POS Migration Tool to transfer the data from QuickBooks POS to Shopify POS easily. To download it, please follow the below steps
- Go to the Home section
- Under QuickBooks POS migration guide, click Import Products
- Click Launch connector
- Then click Install
- Now click Install App
- Then click Get Started to easily migrate QuickBooks Point of Sale to Shopify Point of Sale
- Click Allow
Step 4: Import the Data Files from QuickBooks Point of Sale to Shopify POS
We exported the QuickBooks POS data in Step 1. It’s time to upload the data into Shopify POS. To Import the data:
- Click on +Add data file to the specific type of data field such as Inventory, Customers, and Vendors(See an image below for reference)
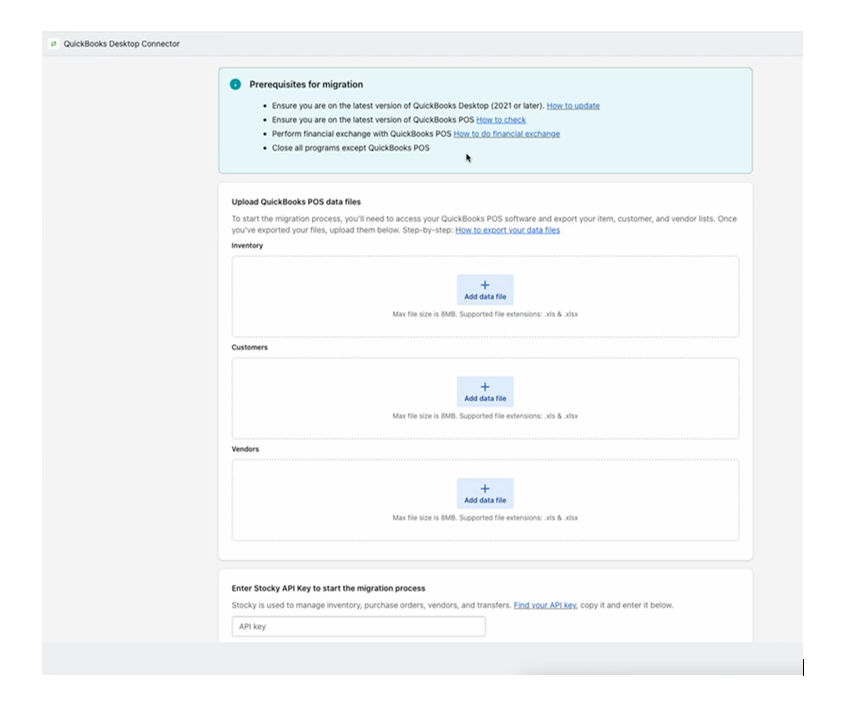
- Browse the location where you exported QuickBooks POS data and then upload it to the Shopify store.
- Select the QB POS items(customers, vendors, etc.) simultaneously and then click Open
- Once the items are uploaded, you need to enter the Stocky API key to start the migration process.
Step 5: Enter the Stocky API key
Stocky is a Shopify inventory management application that is free to use for QuickBooks Point of Sale users. To find your Stocky API key
- While following the above process, click on Find your API key
- The next screen prompts you to enter your Store domain(example.myshopify.com) to install the app
- Then click Install app
- Now your account starts to sync.
- Once it’s complete, click OK
- Then go to Preferences > API access
- Click Generate a new API key
- Now Copy and Paste the current API key into the QuickBooks Desktop Connector
- Then click Next
Step 6: Match or Add a New Location to the Shopify Store
As the data file has been uploaded, you can begin to match the QuickBooks store location to the Shopify store location. You can match up to 20 locations in Shopify.
This feature shows you that the product associated with the inventory stock belongs to multiple locations. Once you’re done matching your location you can start the migration process.
- Under the Location matching section, select an existing Shopify location from the drop-down menu
- To create a new Shopify location, click Add new location
- Click Start Migration.
Now the data migration begins, it may take an hour to five hours depending on your data file size to complete. Once the migration process is completed, you’ll receive a confirmation email.
If you face any problems while migrating QuickBooks POS to Shopify POS, you can speak with one of our experts.
Related Posts