Quicken screen share is a tool used by the Quicken Support to assist you regarding your issue or concern. It’s available in both Quicken for Windows and Mac.
With the help of screen share Quicken agent not able to control or to take any action on your computer. It’s kind of overview to them and they guide you through the steps for your concern while keeping you on the phone line.
Quick Note: Quicken only uses screen share that is available in the software or to their website.
Quicken Screen Share is available in two ways
- Internally, within Quicken software
- Externally, on Quicken website or download this application
So let’s discuss it for both operating systems
Quicken For Windows
To use this tool internally within the software
- Open Quicken
- Go to Help > Screen Share…
- Click on I Agree to allow Quicken representative to view your screen for support purposes.

- After click on I Agree, you’ll ask to put Security Key

- Quicken Support representative will help you with the security key
- Once you got the security key type it into the box and click Share your screen.
Use Quicken screen share externally (If you’re using Google Chrome)
- Go to Quicken screen share page
https://www.quicken.com/screenshare - Enter the Security key that you’ll receive from the support agent
- Click Share your screen
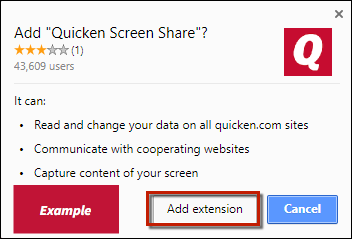
- You’ll be promoted to enable screen share extension in google
- Click on Add extension
- Click on Share
- Now Quicken representative can see view your screen for support purpose
- Once you’re done with support click on Stop Sharing Your Screen
Use Quicken screen share externally (If you’re not using Google Chrome)
- You can download the Quicken screen share app from the official Quicken website
- Once app downloaded go to your downloads (Ctrl+J) and double-click on screenshare.exe
- A box will pop out to Run the .exe file

- Once you’ll click on Run next screen prompt you to install the screen share application
- Click on Install

- Then click Yes to allow user account control permission
- Now a new window pop out that ask you for the security key
- The support representative will you with the security key
Quicken For Mac
To use this tool internally within the software
- Open Quicken
- Go to Help > Screen Share…
- A small window will pop out and asking you for the security that can be provided by Quicken Support agent

- Once you got the security key click on Share your screen
- Now Quicken support is able to view your screen and ready to help you with your concern
- Once your concern is resolved click on Stop Screen Sharing to end the remote session
To use it externally
For external screen share, we’ll update the steps soon or you can download the Quicken screen share app for Mac from here and follow the on-screen instructions.
After following all the above step you’re able to know how to use Quicken Screen Share with Windows and Mac. If you have any doubts please comment your concern into the below comment section we’ll respond it asap. For any Quicken assistance contact Quicken Phone Support.

