QuickBooks Error 6175 0 occurs when switching the company file in the multi-user mode. Error Code -6175, 0 usually arises when QuickBooks Desktop is unable to start or Database Server Manager stopped working.
You may need to ensure the company file hosting settings.
In this post, we’ll discuss the causes and solution steps to fix this error code.
Note: You may also face QuickBooks Error 6177, 0
Causes for QuickBooks Error Code -6175, 0
- A firewall is blocking access for QuickBooks services
- The server that host the company file may busy
- QuickBooks Server Manager is not working to host the files
Note: Process to fix this problem may complex, you can speak with our experts for a quick resolution. Call our experts or leave us your message
6 Simple Steps to Fix QuickBooks Error -6175, 0
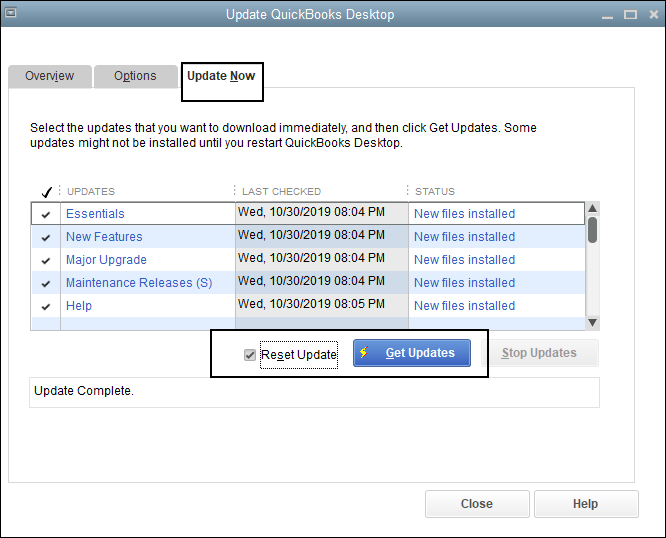
Step 1: Update QuickBooks to the Latest Release
- Open QuickBooks Desktop
- Go to Help > Update QuickBooks Desktop…
- Click on Update Now(To the top)
- Click Get Updates
- It may take some time to update the QuickBooks Desktop
Step 2: Download and Install QuickBooks File Doctor
- Download QuickBooks Tool Hub and go to your downloads by pressing CTRL+J
- Under your downloads list click on QuickBooksToolsHub.exe
- Click Yes to allow this app to make changes
- Now click on Next to install it and then click Yes again for accepting the license agreement
- Click on Next and then Install (It may take some time)
- Once the installation is complete click on Finish
- Now open QuickBooks Tool Hub (Icon will be available on the desktop)
- Under Company File Issues tab click on Run QuickBooks File Doctor
- Click on Browse to select the company file
- Select Check your file and network
- Click Continue
- Enter QuickBooks Admin password and click Next
Now scan begins, it may take some time depending on the company file size. Once the scan finished, your issue is resolved. If not, please proceed further with the below steps.
Step 3: Check Hosting Setting With Workstation
Your server computer should be the only machine that hosts the company file. There are chances that your workstation set to host the company file somehow, we may need to turn it off to remove error -6175, 0.
In order to turn off the multi user mode from the workstation.
- Open QuickBooks Desktop
- Go to File > Utilities
- If you see an option Host Multi-User Access, don’t select it.
- Move to another workstation and check, if Stop Hosting Multi-User Access…is an option click on it to turn off the hosting from the Workstation
- Ensure the same thing with other workstations too.
Step 4: Check Hosting Setting on the Server
After completion with workstation troubleshooting. Make sure about the hosting settings on the Server.
- Open QuickBooks Desktop
- Go to File > Utilities
- If Stop Hosting Multi-User Access…is an option click on it to turn off the hosting
- Then select Host-Multi-User Access this way it’ll reset the multi-user mode.
Step 5: Add Firewall Exception for QuickBooks Services
Make sure QBW32.exe, QBUpdate.exe, QBDBMgr.exe, and QBDBMgrN.exe can go through the firewall.
The below table will help you with the QuickBooks executable files location. Note– XX represents the year version.
| Executable File | Location |
|---|---|
| QBW32.exe | C:\Program Files(x86)\Intuit\QuickBooks 20XX |
| QBUpdate.exe | C:\Program Files(x86)\Common Files\Intuit\QuickBooks\QBUpdate |
| QBDBMgr.exe | C:\Program Files(x86)\Intuit\QuickBooks 20XX |
| QBDBMgrN.exe | C:\Program Files(x86)\Intuit\QuickBooks 20XX |
We can create an exception for these services by following the below steps.
- Press Windows+R keys to open the Run command
- Type Control and click OK
- Choose System and Security > Windows Defender Firewall
- Click Advanced Settings
- Make a right-click on Inbound Rule and select New Rule…
- Select Program and click Next
- Choose This program path and click Browse…
- Select all the executable files one by one using the above chart. Then select Next
- Choose to Allow the connection and click Next
Step 6: Allow QBDataServiceUser with an Admin user rights
- Close QuickBooks Desktop
- Press Windows+R keys to open the Run command
- Type Control and click OK
- Select User Accounts
- Click Make changes to my account in PC settings
- Choose Family & other users
- Now you can see the QBDataServiceUserXX for your current QuickBooks version. It’s important to make changes with correct users such as For QuickBooks Desktop 2020 show you as QBDataServiceUser30, For QuickBooks Desktop 2019 show you as QBDataServiceUser29.
- Click on the user and select Change account type
- Then click on the drop-down arrow and choose Administrator
- Click OK
After following all the above steps you’ll no longer face QuickBooks Error Code -6175, 0 but in case it still exists you can speak with our experts for a quick resolution. Dial our TollFree or Leave us your message.
Related Posts