QuickBooks Error 6000 82 occurs when you’re opening or accessing the company file. Error Code -6000, -82 generally arise when there are company files or network causing this problem.
In this post, we’ll discuss the causes and solution steps to fix it.
Quick Note: You may also face QuickBooks Error 6000, -1076
Causes for QuickBooks Error Code -6000,-82
- QuickBooks company file is corrupted
- Improper network configuration
Things to do before proceeding further with the troubleshooting steps
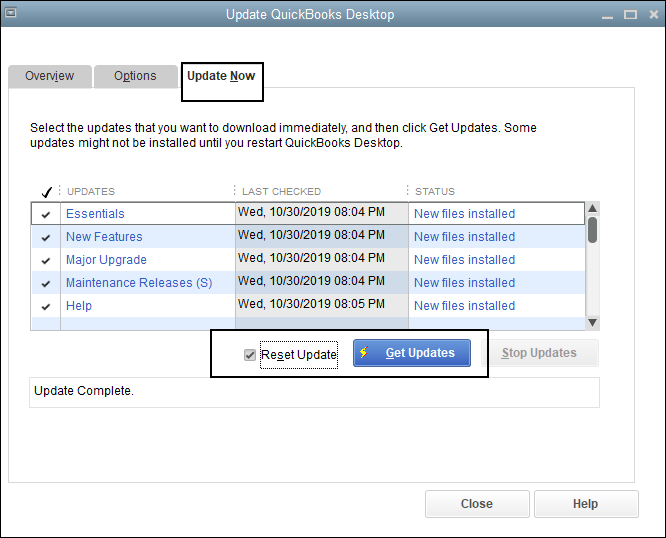
A. Update QuickBooks Desktop
- Open QuickBooks Desktop
- Then go to Help > Update QuickBooks Desktop
- Then click on Update Now to the top right corner
- Click Get Updates
- Once Update is complete, close QuickBooks
B. Run QuickBooks File Doctor to Fix Company File and Network Issues
- Download QuickBooks Tools Hub and go to your downloads by pressing CTRL+J
- Under your downloads list click on QuickBooksToolsHub.exe
- Click Yes to allow this app to make changes
- Now click on Next to install it and then click Yes again for accepting the license agreement
- Click on Next and then Install (It may take some time)
- Once the installation is complete click on Finish
- Now open QuickBooks Tool Hub (Icon will be available on your desktop)
- Under Company File Issues tab click on Run QuickBooks File Doctor
Important: Process to fix this error may complex, you can speak with our experts for a quick resolution. Leave us your message.
5 Simple Steps to Fix QuickBooks Error -6000,-82
Step 1: Remove the spaces after the company file and before the company file extension
- Close QuickBooks Desktop from all the machines
- Open the folder where the company file is saved
Don’t know where the company file is stored? You can check the company file location on No Company Open Window. You can open this window while holding Ctrl+Shift keys and then make a double click on the QuickBooks desktop icon.
- Make a right-click on the company file and select Rename
- Rename the company file and then ensure that there are no spaces between the file extension and the name of the company file.
- Now reopen QuickBooks
Step 2: Turn off the hosting with each and every computer where QuickBooks is installed
For Single User Access
- Open QuickBooks desktop while holding Ctrl+Shift keys
- Then No Company Open window will appear
- Now go to File > Utilities > Stop Hosting Multi-User Access…
- Click Yes to confirm “Stop hosting multi-user access”
- Then click Continue and then Yes, if it asks to turn-off hosting
For Multi-User Access
You need to follow the below steps with each of your computer where QuickBooks is installed.
- Open QuickBooks desktop while holding Ctrl+Shift keys
- Then No Company Open window will appear
- Now go to File > Utilities
- Ensure that Host Multi-User Access… is showing that means the user is not hosting the file. In case it’s showing Stop Hosting Multi-User Access… click on it and follow the on-screen prompts to turn off the hosting
- Try to open the file again it may work. If not please proceed further with the below step.
Step 3: Switch to hosting Local and remote file mode for Multi-User Access
- Open QuickBooks and press F2 key for the product information window
- Once the product information window is open look at the bottom under LOCAL SERVER INFORMATION section set hosting local files only
- Now go to File > Utilities > Host Multi-User Access
- Open the company file on a network computer and then open the product information windows by pressing F2 key
- Now ensure that hosting is set local files only under the Local Server Information.
If the above 3 steps don’t work out for you, please proceed further with the below steps.
Step 4: Download and Run Quick Fix My Program
- Download QuickBooks Tool Hub and go to your download by pressing CTRL+J
- Under your downloads list click on QuickBooksToolsHub.exe
- Click Yes to allow this app to make changes
- Now click on Next to install it and then click Yes again for accepting the license agreement
- Click on Next and then Install (It may take some time)
- Once the installation is complete click on Finish
- Now open QuickBooks Tool Hub (Icon will be available on your desktop)
- Go to Program Problems tab and click on the Quick Fix my Program
- It may take some time and then restart your computer
Step 5: Perform QuickBooks Data Troubleshooting
You may need to perform the QuickBooks data troubleshooting steps because there is a possibility that your company file is damaged or corrupted.
You can speak with our independent expert for a quick resolution to fix QuickBooks Error Code -6000,-82 or leave us your message and we’ll contact you.
Related Posts